
Getting Started with ccScan
Thank you for downloading our software! This document is designed to help you get started and answer the common questions that hundreds of customers have asked us when getting started with ccScan.
Please take the time to read through all of this information and save it for future reference.
Please Note: ccScan is a Windows-based software and installs only on a Windows computer. It will not install on a Window server and will run on a Macintosh computer only if running in a Virtual Machine like Parallels or Fusion hosting Windows.

If and when you get stuck select “Help” from the ccScan menu bar shown above and then “Show Help” which displays the opening Help screen.
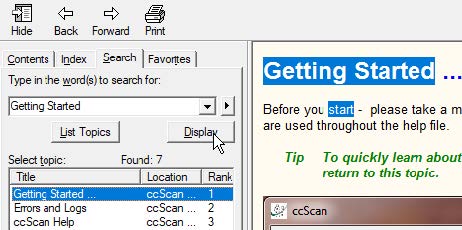
Click on the “Search” tab. Enter a word or phrase to search, for example ‘Getting Started’. Press “List Topics”, double-click an item or select an item and press “Display.” Review the full topic in the right window.
Some Quick Housekeeping …
Once you’ve added the activation key and processed through the Setup Wizard you will see a window like the above graphic Notice where the big red numbers are stamped:
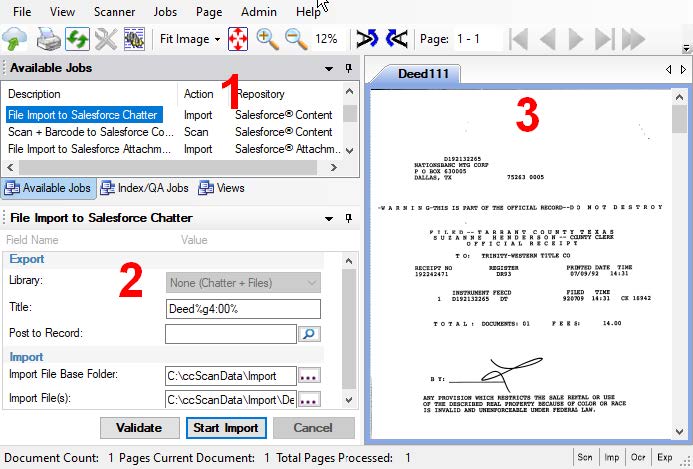
Window 1: This is the Available Jobs window. We’ve given you a number of the sample jobs. The intent is that you modify these jobs so they make sense for your workflow.
Window 2: This is the Current Job window showing the current job with job fields visible to help identify or classify the new document. When you create or customize a job you have the ability to display a field allowing the user in real time to enter data. There are many job fields representing properties of the job or provider. But you can see that this job is setup to show only a few fields starting with the Salesforce Library and ending with the Import File to be imported.
Window 3: This is the Document Window where you can preview the document immediately after being scanned or imported prior but prior to exporting it to the Cloud.
![]()
The big red arrow in the bottom right-hand corner of the ccScan window, shown above, points to four icons: SCN= scanning
IMP = importing
OCR = optical character recognition
Exp = exporting
Each icon spins as that task is performed. The blue icon shows that ccScan is exporting a document to the Cloud or a local or network file folder. Watch for these activities as ccScan is running. Also note the Document Count, Page Count and Total Pages Processed.
Now let’s set up your scanner to communicate with ccScan.
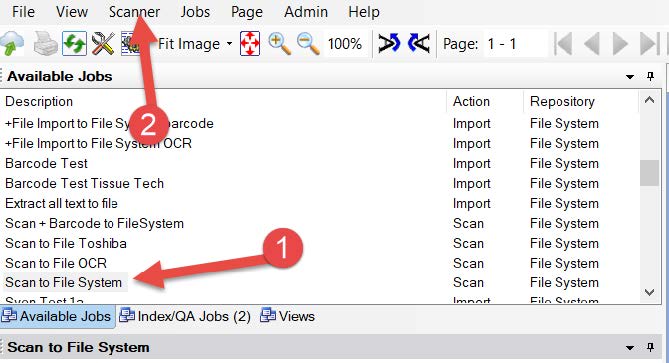
First, in the Available Jobs window double-click on ‘Scan to File System’.
Second, pull down the Scanner menu item and click on Select Scanner. This displays a small dialog box named “Select Source” which is imaging lingo for the document scanner, camera or other imaging device.
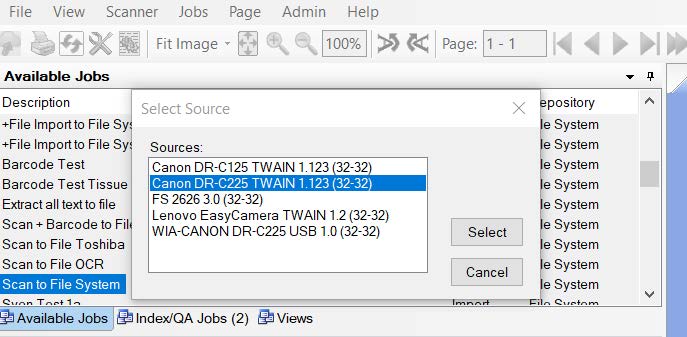
The Select Source dialog looks something like the above. If your scanner is powered on and properly connected to your computer, you should see its name in the Sources list. The names represent all of the TWAIN scanner drivers that are installed on this computer. If the window is blank or does not show your scanner it is probably not connected to your computer. Work with your IT department and properly install the scanner and drivers.
Very important! ‘WIA’ drivers are not compatible. Select only drivers containing ‘TWAIN’
Once you have selected the driver and press OK, you have connected that scanner to every scanning job in ccScan.
Let’s test it. But first I’d like to explain the basics of ccScan jobs.
• Every job is either for scaning or importing. You can also view documents in Amazon S3 or local/network files and folders. More of that in the next document.
• Default jobs are provided to help get you started. But you can easily edit these jobs and save them as jobs with different names.
• And you can easily create new jobs from scratch. There is no limit to the number of jobs you create or use.
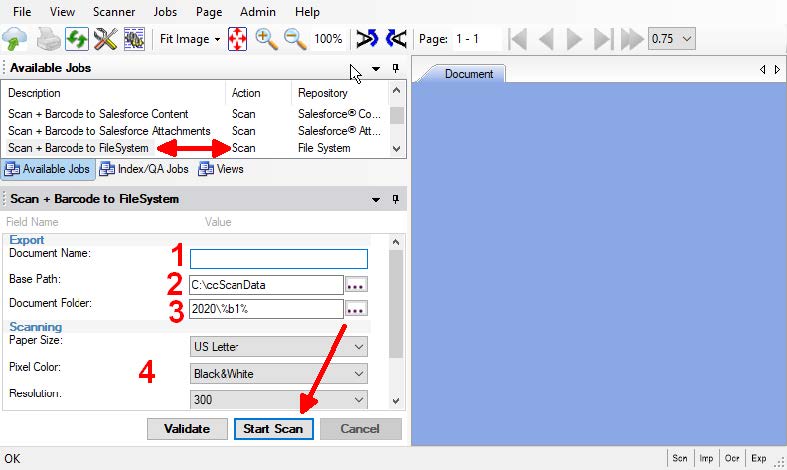
Notice that we selected the Job Description: “Scan + Barcode to File System”, the Action is “Scan” and the Repository is “File System.” Jobs are quite similar among other providers.
1 – Document Name – This could be prefilled automatically by the barcode, a incrementing counter or other ‘macro’ or manually by the user. If using a counter like %g1:00%, part of the document name would be 1, 2, 3 etc. Counter and other macros start and end with %. (More on macros later)
2 – Base Path — This is a pre-filled path or folder which is the parent folder where document for this job are stored. We have chosen the folder C:\ccScanData which is created by ccScan Setup.
3 – Document Folder – Here is a lower level folder that you might create. It could by the year the document was created or sent. A second folder could be named by a barcode. The barcode value is represented by another macro. This could represents the Month folder. So the final destination of that file would be C:\ccScanData\2020\April and its name could be: Order from Roberts Company.
4 – Scanning Settings – These fields can be shown and changed by the user provided in case documents change size, color or resolution in dots per inch. Many additional scanner properties can be set so you don’t need to go into the scanner manufacturer’s settings dialog, which is often confusing.
Finally, load a document into the scanner and click the “Start Scan” button at the end of the large red arrow. The paper should move quickly through the scanner and create a file in that export folder. You will see the pages as they are scanned. Don’t forget to take a peek at the bottom right-hand corner and watched those icons spin as they are working.
Congratulations – you now have ccScan up and running!
If you would like a pdf, printable version of this page you can download it here
Our Partners
![]()
Carahsoft Technology Corp. is The Trusted Public Sector IT Solutions Provider™, supporting Federal, State and Local Government agencies and Education and Healthcare markets. As the Master Government Aggregator® for vendor partners, they deliver solutions for Cybersecurity, MultiCloud, DevSecOps, Big Data, Artificial Intelligence, Open Source, Customer Experience and more. See the ccScan listing for government document capture and scanning solutions users here.